Introduction
This guide discusses the Multi-Unit Network functionality available on the Irisys Vector units, and how to configure it. This functionality is also referred to as Wide Opening Network, and Wide Tracker Network.
A full understanding of the settings below is essential to ensure the high accuracy that the Vector 4D devices are capable of.
Note: for correct wide tracker functionality always ensure devices are updated to latest firmware before configuring. See also separate section physical connection of devices on a multi-unit network.
Wide Tracker Settings
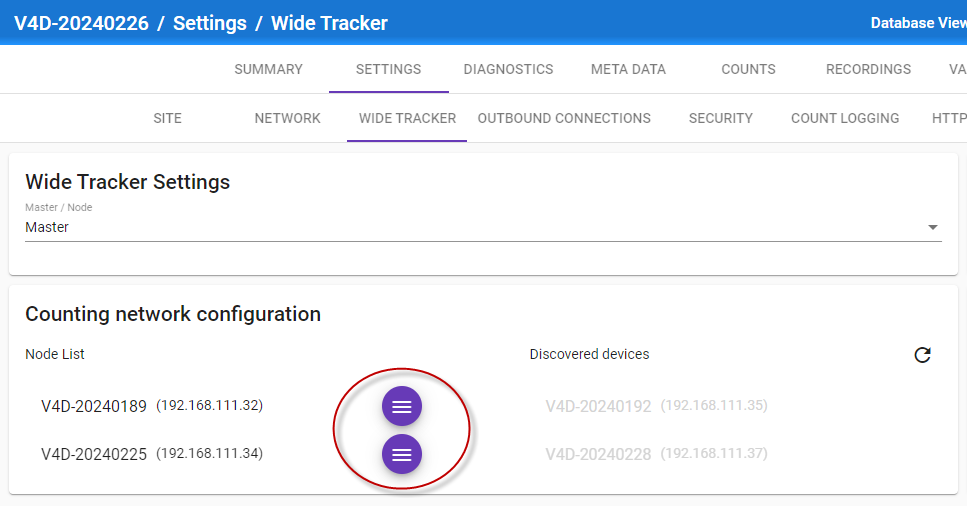
Once you are connected to your Vector, the multi-unit ‘Wide Tracker’ settings are accessed from the main ‘Settings’ tab:

 If connected to a Vector via an Estate Manager connection, make sure you select the ‘Live View’ option to make changes. See also specific Estate Manager notes below.
There will always be one device on each network which does all the counting, data logging and outputs (or sends) the data – this device must be configured as a Master device. All other devices that you want to work on the multi-unit network must be configured as Node devices. Which of the devices is the master and which are the nodes is up to you, but it should be remembered that the master as this is the one that will be directly connected to once everything is correctly configured, so it is recommended that on a wide opening doorway of three devices that the middle unit is the master, for example.
Once the node units have been set to operate as nodes, connected to the Master, will show any available Nodes detected on the network in the ‘Discovered devices’ list. Clicking a Node device in the discovered list will move it to the ‘Node List’ and assign it to that master’s multi-unit network. If a required Node device is not shown, confirm that it is set to be a ‘Node’, is on the same network as the Master, and isn’t already assigned to a different master; click the list refresh button (shown right) if required.
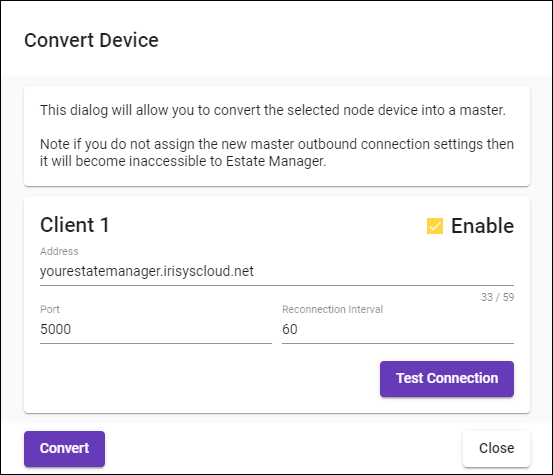
Clicking on a unit already in the Node List will move it back to the available ‘Discovered Devices’ list. See additional notes on breaking a Wide Tracker network below.
Once devices are configured to operate on the multi-unit network, the spacing between each device must be configured to reflect where devices have been installed…
Device Positions and Directions
Once devices are installed they must be configured with their positioning information. This is done so that devices can track a single person correctly as they move between each separate field of view from one to the other.
Essentially as a person leaves one field of view and enters the next there should be a smooth transition and a continuous tracking of a single target.
By configuring the devices to reflect their real world installation positioning smooth tracking of targets is achievable and the high accuracy that Vectors are capable of can be reached.
For details of how to configure the X & Y positioning information see the Device Alignment section.
Additional Estate Manager Notes
If configuring a multi unit network via Estate Manager connections, it should be noted that each master will have a separate Outbound Connection into Estate Manager, and when setting the required units to be Nodes that connection will drop.
When setting a master to be a node via an Estate Manager connection, you will be prompted to confirm the action. Take heed of this warning and double check the network setup before clicking 'OK':

As long as the local network allows connection between the master and node(s), connection to the master will show the node(s) in the available 'Discovered Devices' list and they can then be assigned to that master.
If, after converting a master to a node via Estate Manager, the new node does not show up in the Discovered Devices list, wait a few seconds for the change to take effect and then click the refresh button. If a node never appears, local network settings must be confirmed:
Breaking a Wide Tracker Network


Copyright © 2022 InfraRed Integrated Systems Limited
No part of this publication may be reproduced without prior permission in writing from InfraRed Integrated Systems Limited. This document gives only a general description of the products and except where expressly provided otherwise shall form no part of any contract. From time to time changes may be made in the products.
