Introduction 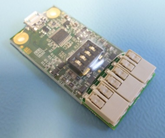
This document describes the features and configuration options of the IWC6203 Vector USB-IO module. This is an Input/Output hardware module which connects over USB to a Vector counter device and allows external signals to be input (and counted) and/or device counts to be output to other external devices.
Features
The USB-IO module provides a solution to a multitude of interfacing requirements:
- Providing a mechanism for bringing third-party inputs into the counting system – e.g. from beam-breaks, inductive car loops, swipe card readers, RFID tags, etc.
- Providing a means of adding relay output to a Vector installation.
- A single IP data channel for all your digital counts when connected to a Vector master counter.
USB-IO Module (IWC6203) Specification
Communications
- Communication between the IO module and the Irisys people counter uses USB.
- The IO Module is a USB 2.0 ‘full speed’ (12Mbit/s) device.
- Connection to the IO module uses a USB Micro-B connector.
- A 25cm USB type-A to Micro-B cable is included.
I/O Channel Details
- The USB-IO module provides two inputs and two outputs.
- These are connected using a screwless terminal block.
- Wire size can be between 24 AWG and 18 AWG.

Digital Inputs
- Both inputs are referenced to ground.
- The voltage applied must be in the range 0V to 28V.
- A High level must be over 3.3V
- A Low Level must be below 1.0V
- (Between 1V - 3.3V will be indeterminate)
- The default input state is low, pulled down via a 1M ohm Resistor to stop unused lines floating
- Both inputs are de-bounced in software (filter configuration is provided for this)
- All inputs are high impedance with an input of between 0-15 Volts. At 15-30 Volts the impedance will be 358k due to protection circuitry beginning to conduct.
Digital Outputs
- Both outputs are referenced to ground and are ‘open drain’ type.
- The voltage applied must be in the range 0V to 28V.
- Each output can sink 300mA max.
- The ‘on resistance’ of the output FETs is 0.6 Ohms or less.
- The outputs will have 2 modes:
- Normally High (with the FET Off), pulsing Low (default option)
- Normally Low (with the FET On), pulsing High
- The pulse width can be between 1ms & 1000ms, software configurable, in 1ms increments
- A heart beat pulse can also be configured if required. Pulses of between 1ms & 1000ms (in 1ms increments) output at intervals of between 10 & 600 seconds can be configured.
Internal Pull-up / Pull-down Resistors
- The IO module includes optional pull-up / pull-down resistors, which are configured using a tri-state DIP switch.
- Both inputs and both outputs have the following options:
- No pull-up or pull-down (default option)
- 10k pull-up to +5V
- 10k pull-down to 0V
Power Supply
- USB Powered (5.0V, 30mA).
- Connected directly to Vector USB connector.
Dimensions
- 53mm x 26mm x 7mm.
Connections
The USB-IO module connects to a Vector via the supplied USB cable from the USB-IO module to the USB type-A socket on the master Vector counter.
The 0.25m cable provided allows the IO module to be located either in the ceiling space, or if this is not accessible, within the housing of the Vector people counter. Depending on the installation location, standard USB cables can be used where a longer cable is required. Note that for any USB device, the maximum length of the USB cable is 5m.
 The USB-IO module is provided with a heat shrink covering. This protects the components and provides electrical insulation over most of the board. If there is a requirement for greater protection of the IO module, and there is sufficient space available, improved robustness and all-round electrical insulation can be achieved by fitting the unit in a small plastic box (please source locally - example shown is not supplied by Irisys).
Internal Schematic
For those interested, the internal schematic of each input and each output, is shown here:

Configuration (Hardware)
Onboard ‘DIP switches’ are provided to allow configuration of the internal pull-up or pull-down resistors that might be required for each channel. Note that the dip switches are located beneath the external clear heat shrink covering, but you can operate the DIP switch through the heat shrink using a small screwdriver. Alternatively, if required, the heat shrink can be carefully cut away to access the dip switches. Take extra care to not damage the mainboard, as this kind of damage is not covered by manufacturer’s warranty.
One switch is used for each channel as follows:
| Switch Number | I/O Channel |
|---|---|
| [1] | Output 1 |
| [2] | Output 2 |
| [3] | Input 1 |
| [4] | Input 2 |
The DIP switch used is a ‘tri-state’ type. For each channel, the switch can be in one of three possible positions:
| Switch Position | Function |
|---|---|
| [+] | Internal 10k pull-up to +5V |
| [0] | No internal pull-up or pull-down (default setting, as supplied) |
| [-] | Internal 10k pull-down to 0V |

This photo shows the default state as the unit is supplied. The switches are all in the central (0) position. No internal pull-up or pull-down resistors are applied.

This photo shows the configuration with the internal pull-up enabled for output 1 (switch [1] set to [+]), and the pull-down enabled for input 1 (switch [3] set to [-]).
The internal pull-down resistor may be used with any I/O voltage within the range 0V to 28V.
Wiring Connections
Care should be taken to wire correctly based on the equipment that you want to interface with, its requirements, and the USB-IO module requirements. You may need to speak to the manufacturer of your external hardware if you are not sure.
Input Options
Below are a number of different input options based on the type of equipment being interfaced with:


Output Options
Below are a number of different output configuration options:


Configuration (Software)
The USB IO module also needs to be configured as part of the Vector main setup. This is so that inputs can be handled correctly, and/or register increments can be configured to output on the relays, as required.
When the USB-IO module is connected to the Vector an additional ‘Relay’ tab is available under Settings:

Each Relay Input and output can be independently enabled or disabled, as required.
Configuration of Relay Inputs

Relay Input Configuration:
- Enable the Inputs “Operation”.
- Select the default state of the input - ‘Low’ or ‘High’.
- Enter a new Register name to store the inputs under. Each time an input is received that register will increment.
 Lastly, by clicking the ‘cog’ symbol under the Limits column, a filter settings dialog will open. Here you can set Upper and/or Lower limits for input pulses. e.g. any pulses smaller than the lower limit size specified, or greater than the upper limit specified will not be counted. This may be required in certain circumstances to eliminate interference or ‘switch bounce’, for example.
Configuration of Relay Outputs

Relay Output Configuration:
- Enable the Outputs “Operation”.
- Select the default state of the output - ‘Open’ or ‘closed’.
- Assign the Register(s) to be output on that relay. Note that you can have multiple registers assigned to the same output if required. Each time a register increments, the output will trigger.
- Choose the relay mode, which in most cases will be the standard ‘Pulse’ mode.
Choose the pulse width associated with that register increment. If you assign multiple registers to the same relay output your external equipment will be able to differentiate between register pulses if different pulse widths are assigned.
Configuration of Relay Heartbeat
As well as the ability to output register increments as pulses, you will notice that an additional ‘Heartbeat’ register is available for selection from the Register list:

This is intended to be used as an early fault warning system.
When configured, a relay pulse of specified width, will be output after the ‘Heartbeat Period’ specified. This means that the logging equipment should expect an incoming heartbeat pulse and should not recognize this pulse as a count increment (the heartbeat pulse can be configured differently to standard count pulses if required in order to achieve this). The intended use of this pulse is so that, if ever the heartbeat pulse stopped being received by the logging equipment, it would ‘know’ straight away that there was a problem of some kind, and an alert could be raised to call an engineer or investigate further. Not all loggers support this functionality.
Equipment Interfacing Notes for Outputs
A very important consideration when setting up the USB-IO module, is what settings to use on any relay outputs, as failure to configure the settings correctly, can lead to incorrect, or missing, data.
The relay configuration options available cater for the vast majority of logging equipment available, and when configured correctly will mean that what the USB-IO module outputs will be correctly recognised and interpreted by the logger.
Relay outputs can be configured to be normally open or normally closed, and you have the option of using the internal pull up/pull down resistor or provide your own external pull up/pull down.
It is important to understand that there are two main types of logger that the USB-IO module will be connecting to; those with clock-based inputs and those with edge detection-based inputs.
• Clock based inputs
This type of logger checks the status of the input every clock pulse. The main concern with clock-based inputs is that the relay output pulse is not too quick for the logger to ‘see’. In general, you should check with the manufacturer to see what the internal clock rate of the logger is and then set the pulse width to a size where it will not fall in between two logger clock cycles. It should also be long enough so that any interference - which may be picked up on the relay line - can easily be differentiated and not counted.
Normally, there is no maximum length that the pulse width can be, aside from introducing a delay in sending out pulses one after the other in the event of a stream of people being counted one after the other. Some very basic loggers will expect the signal to go low after a certain number of clock pulses and so care should be taken to avoid such loggers interpreting long pulses as more than one count.

• Edge detection-based inputs
Here, the change from a high state to a low state, or vice versa, dependant on configuration, is detected. The main thing to remember with inputs using edge detection is that the pulse width does not normally matter. Outputting more than one count on a single relay using different pulse widths for each does not usually work on this type of input.
Notes on Output Pulse Buffering
Because a relay pulse takes a certain amount of time to output, the pulses are buffered so that none is missed during busy periods where traffic is being counted faster than the pulses can be output. This can sometimes result in a string of output pulses one after the other, and sometimes the pulses will continue going on, well after people have left the field of view, until the buffer is empty. Care should be taken to not choose a very long pulse width setting as this will mean that the buffer could take a very long time to empty. This is especially true when multiple lines are assigned to the same relay, and all are using long pulse widths. For example, if the pulse width is set to 200mS, and 10 people are counted at roughly the same time with a very small amount of time between each one crossing the count line, it will take just under 4 seconds to output all the pulses:

Power failure and / or rebooting the Vector people counter
The USB-IO module is powered from the Vector people counter. If power to the Vector unit is lost, the I/O module will also lose power. If the Vector unit is re-booted, power to the I/O module will be lost temporarily, until the unit has completed the booting process.
In the power loss situation, the I/O module is not able to receive input signals, and any signals present will be ignored.
It is also unable to drive its outputs – the output FETs will turn off, and the internal pull-up resistor (if enabled) will not be able to pull up to 5V when there is no 5V power available. To avoid spurious outputs in this situation, we recommend that the default state of the outputs should be with the FETs in the off state, only turning on when an output pulse is being generated. Depending on the configuration of the connected equipment, external pull-up resistors may be required to keep the signals in the ‘high’ state when the USB-IO module is not powered.
Copyright © 2022 InfraRed Integrated Systems Limited
No part of this publication may be reproduced without prior permission in writing from InfraRed Integrated Systems Limited. This document gives only a general description of the products and except where expressly provided otherwise shall form no part of any contract. From time to time changes may be made in the products.